I think it’s long overdue that I post about my wedding. It feels like only yesterday, however it’ll soon be our one year anniversary and I can’t believe how time has flown.
Now as most of us know, Pinterest is populated by many many wedding ideas. We’re all dreamers and lets face it, Pinterest is used mostly by those of the female population, so of course there’s going to be lots about weddings! So naturally, that’s where I looked for ideas.
I’m a DIYer, if you haven’t noticed. I was also only formally engaged for 2 months (no, it wasn’t shotgun or anything like that, just didn’t see a point in waiting). But I still wanted to have the wedding of my dreams, so with a LOT of help and a LOT of work, we made it a success. Doing a DIY wedding is definitely not for everyone, in fact, if you have the money to buy most of the things that you love on Pinterest and don’t want to take a lot of time to make things, then it’s a good route to go. I basically spent those 2 months before the big day crafting, gluing, sewing, bending, painting, stapling, pounding and stringing during every free moment I had. If that’s how you enjoy spending your time, then join the ranks of us DIYer’s, but if you just love the look of it then there are many of us out there willing to make it for you!
What I’m going to show you are all of (or most of) the ideas that I took from Pinterest and used in my own wedding. I’ll let you know how successful they were, how much skill was involved and how long it took to do. Hopefully it will help someone out there in planning their wedding or add more photos to the dream boards of Pinterest 🙂
I’ll be posting this in 5 sections, so keep checking back for more updates!
First up,
The Props
Probably one of the biggest things people get into posting on Pinterest is all the cutsie things that pull a wedding venue together and give it a theme. These are the props. They’re also what takes the most work in planning where they go, exactly what to do with each item and making them (if you’re like me).
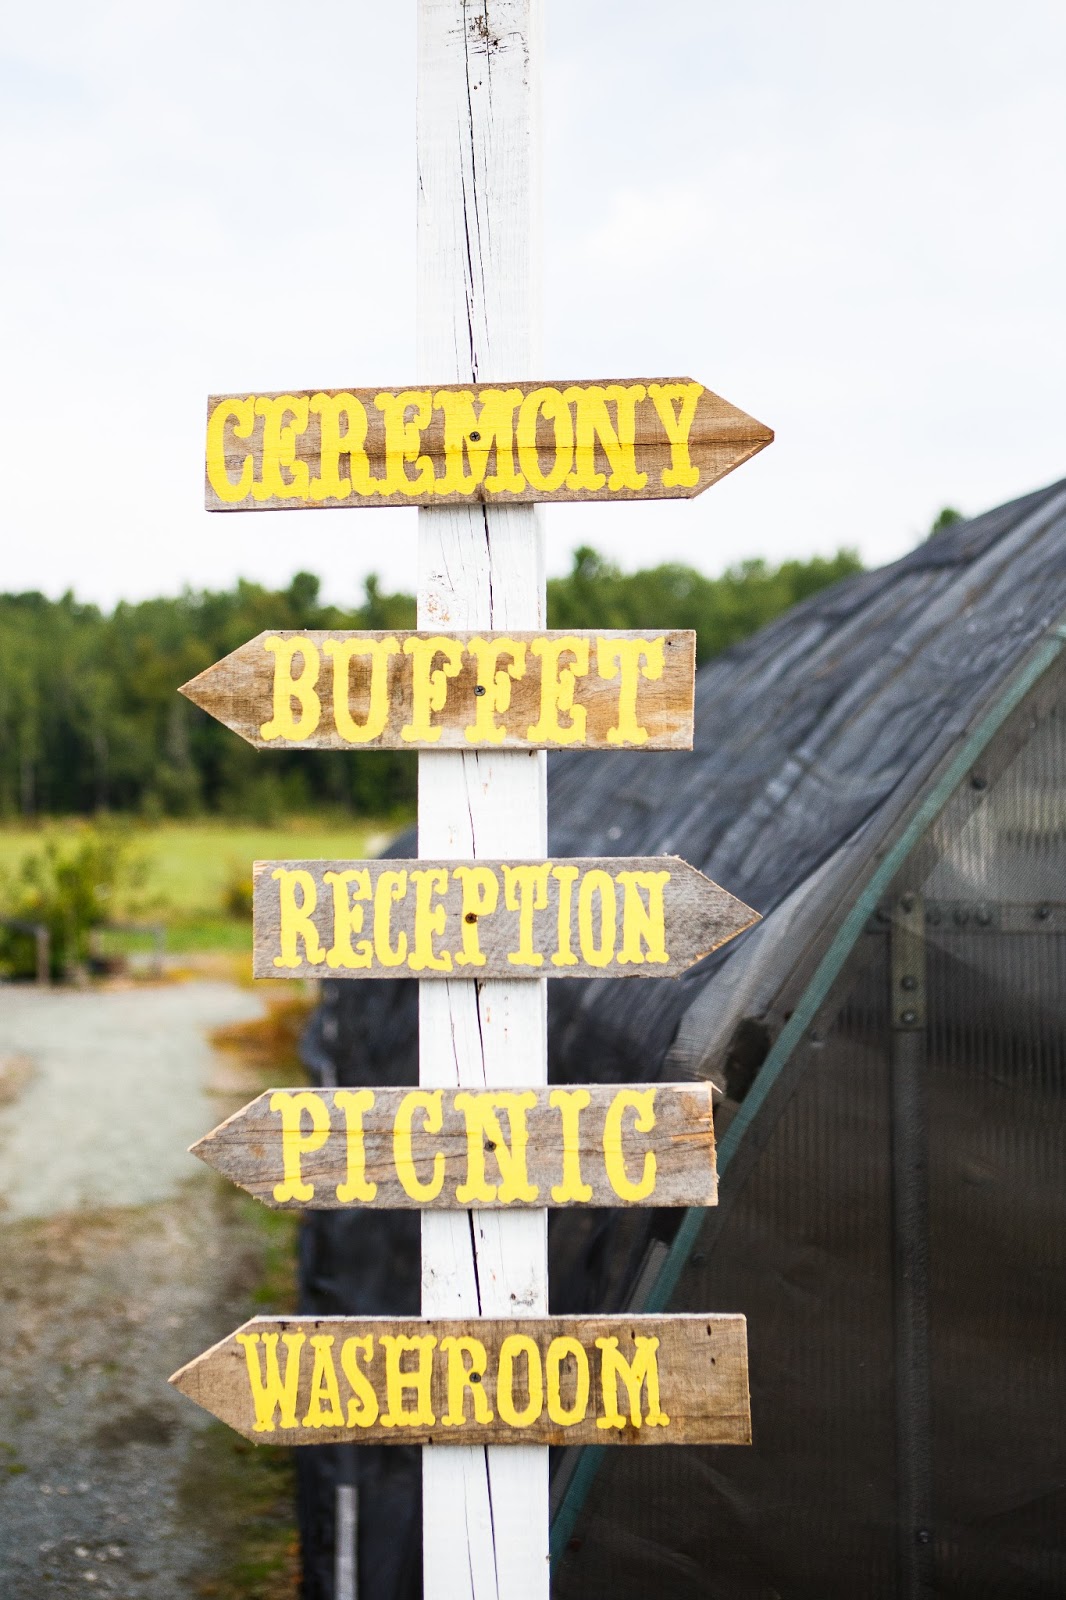
These post signs were really easy to do. They did take some time though because you want the words to come out just right and be readable. I used old pallet planks and sawed them into arrows then traced each letter out individually with templates cut on a Cricut. I wanted to make sure each word fit and they were centered. After tracing, went back and painted in each letter.
This picture has 2 DIY projects. These are both easy as well. I love chalkboards, and with chalkboard paint, anything can be made into one! I saw somewhere in my Pinterest browsing silver trays as chalkboards and thought it was the smartest idea, so you’ll see throughout that I made a few of them and used them in different places. The other item seen in this picture is the seating chart on chicken wire in a colourful frame. Another easy project. All you need is an old frame, some spray paint, chicken wire and a staple gun. It’s a cute way to keep with the theme and still have a “formal” seating chart.

Table numbers…Oh the many way to do table numbers… I saw this one quite a while ago on Pinterest. I don’t believe the original pin was for wedding table numbers but I loved it and just had to have it! The hardest part of this project was finding the doorknobs and doorplates at a reasonable price. Because they are antiques you can spend upwards of $100 or more per set (meaning 1 door knob and 1 plate to go with it). I just wasn’t willing to pay that much so it took quite some time to find them. I bought all of mine off of ebay and they didn’t come in sets. I had to buy knobs and plates here and there, then piece them together afterwards. Another thing that will happen is that because they’re antiques again, they will most likely have some blemishes or even be strange colours. To remedy this and keep them all looking similar, I bought a metal spray paint that was bronze coloured and went to town. Voila! They all match. I’ve also seen on Pinterest ways to remove the paint afterwards, so if you’re concerned about “ruining” them, I wouldn’t worry too much.
The next hardest part about this project was getting the knobs to stay in place. They don’t have screw holes in the back, in fact they don’t even have round holes. The mechanism back then was square, so alas, crazy glue was my end solution. It works…but only for a short time. Don’t drop them or try to hang anything on them if you do it this way, they’ll break. Caulking could also be a way to go in adhering them to the plates permanently.
The last and final thing for this project is to chose what you’ll do for the numbers. You can buy house numbers if you can find them the right size or you can do what I did (the cheaper way) and use a router to drill in the numbers then paint them in.
Put it all together and you have a very attractive number for one table….oh, you have more than 6-8 guests? Well enjoy! I had to make 13 so I feel your pain. But they were worth it!
Next up is the use of a dresser and the poofs (as I call them). Lets start with the poofs. Great little things! They are so easy to do and they really do look great, especially as space fillers. We had our wedding in a green house, so I wanted to decorate up the walls as much as possible to give it a homey feel instead of industrial. Note: brown tissue paper is extremely hard to find! Who knew? But you know what works? Paper towel from the folded paper towel dispensers. You know the stuff, the old dispensers before they started doing rolls. You may think I’m crazy but they were my favourite end result. 2 pieces and you have the cutest poof ever and in a great colour!

I saw the use of a dresser as a prop once while scrolling through pins and couldn’t get it out of my mind. I just loved the way it looked. So naturally, it became the star of my dessert buffet (or was that the dessert? Depends on who you ask) Either way, it added so much to the theme. We found that the space was limited though and to actually have enough dessert for everyone you’d almost need 2 or 3 dressers. So instead, we put boxes into the drawers and pulled them out, adding depth, layers and more space! Dressers, just do it.
89 lanterns. I think that’s the number we had by the end of it. These make a great prop for setting the atmosphere. But would I suggest making that many? Probably not…unless you have a lot of time as I’ve said before. They are easy though! Just some wire and a mason jar. What else can I say about these little darlings? Not much, they kindof speak for themselves.
This next item was hard to place in the headings. It’s not a prop, it’s not a gift, it’s not really something fun either. It’s something that basically every bride wears and is second to the dress and shoes. Your veil. Trending right now is the birdcage veil. I looked into buying one and then saw the prices that bridal stores were charging. Ridiculous. Especially when these are so easy to make. You can find tutorials online and buy the material as well, I found mine material on Etsy. The hardest thing was making it keep the right shape, but a little blow drying and pulling to set, and it was done. I strongly suggest trying to make your own if you’re crafty, if you’re not, then many people who are can sell you one.


 So I realize it’s been quite some time since I’ve posted. Okay, a very long time. I guess that’s what happens when you


.jpg)


